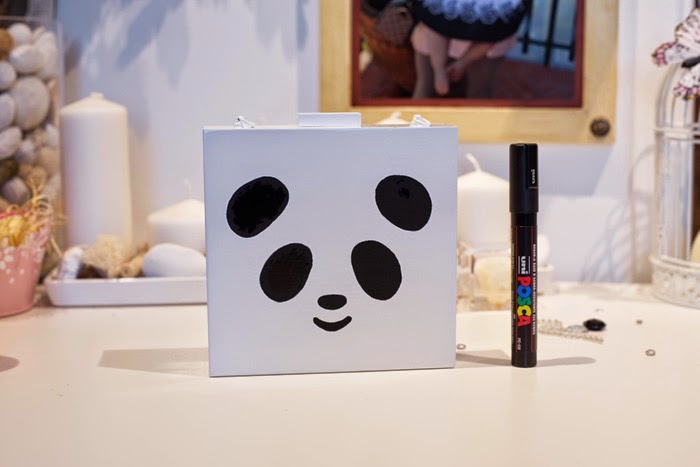
Se vi ricordate nella sezione SHOPPING di qualche settimana fa c’era questa clutch super kawaii firmata Charlotte Olympia, in mezzo a tanti accessori e tee a tema “panda”. Insomma, mi sono lasciata conquistare e, armata di tanta creatività, mi sono messa all’opera e sono riuscita a riprodurre in una versione low cost questa borsetta fantastica. Allora, che aspettate? Seguite questo DIY per realizzare una stupenda clutch a forma di panda!
If you remember few weeks ago I have posted in the section SHOPPING this super kawaii Charlotte Olympia clutch, in the midst of so many accessories and tee “panda” themed. In short, I fell in love and, armed with so much creativity, I started work and I was able to create in a low cost version this fantastic handbag. So, what you waiting for? Follow this DIY to build a beautiful clutch in the shape of panda!
Vi serve:
- una borsetta rigida (in plexiglass) in tinta unita
- tintura spray acrilica bianca
- pennarello UNIPOSCA nero
- due brillantini
- colla UHU
- vernice fissativa spray per colori acrilici
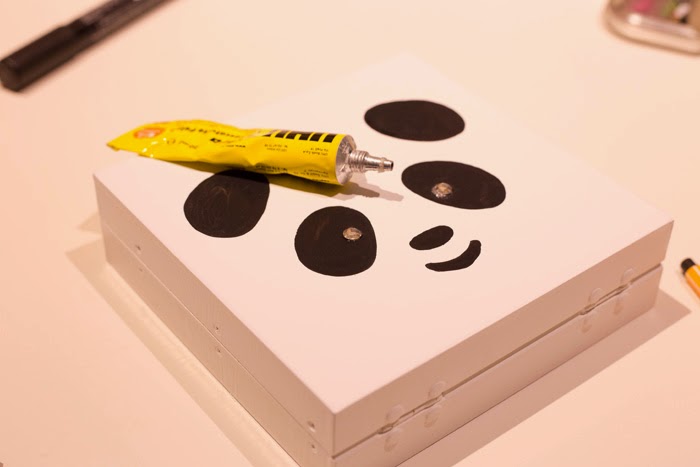
Prendete la vostra clutch e spruzzatela con la tintura acrilica bianca e lasciare asciugare per qualche ora. Se il risultato non vi soddisfa o vedete qualche trasparenza, ripetete l’operazione.
Disegnate la faccina del vostro panda prima con un pennarello a punta fine e poi colorate il tutto con il pennarello UNIPOSCA nero. Per quanti riguarda la mia esperienza, ho dovuto ripassare più volte i vari particolari in nero per ottenere un effetto soddisfacente. Lasciate asciugare e incollate i due brillantini con la colla UHU, in modo da formare le brillanti pupille del vostro panda.
Lasciate asciugare il tutto per una notte e la mattina seguente spruzzate su tutta la borsa la vernice fissativa.
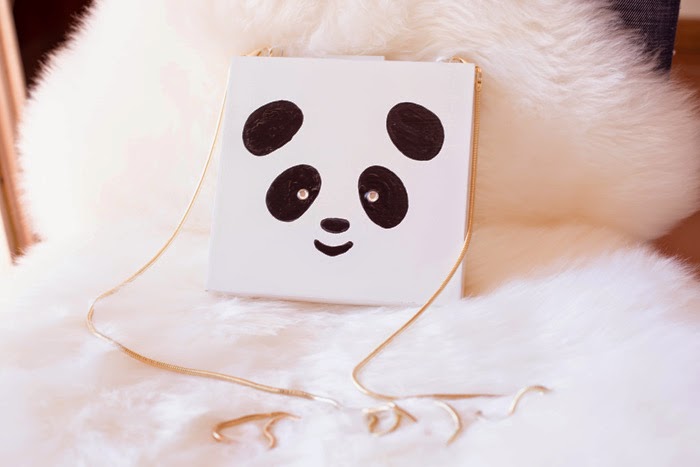
Benissimo, adesso avete realizzato la vostra borsetta a forma di panda e la potete sfoggiare anche con l’outfit più semplice del mondo per dargli un tocco di originalità!
You will need:
- a handbag (plexiglass)
- dye white acrylic spray
- Uniposca black marker
- two glitter
- UHU
- fixative spray paint
Take your clutch and sprinkle with white acrylic dye and let it dry for a few hours. If the result does not satisfy you, or you see any transparency, repeat the operation.
Draw the face of your panda first with a fine-point marker and then color it with the black UNIPOSCA marker. Let dry and glue the two glitter with UHU, in order to form the brightest pupils of your panda.
Let dry for one night and the next morning sprayed over the entire bag with the fixative spray.
All right, now you have made your handbag in the shape of a panda and you can show off even with the simplest outfit in the world to give a touch of originality!


Grazie per esser passato da me ♥ || Thanks for reading ♥
FOLLOW ME ON:
[learn_press_profile]